I’ve had a lot of fun in the past month with cakes, and here are three more to prove it.
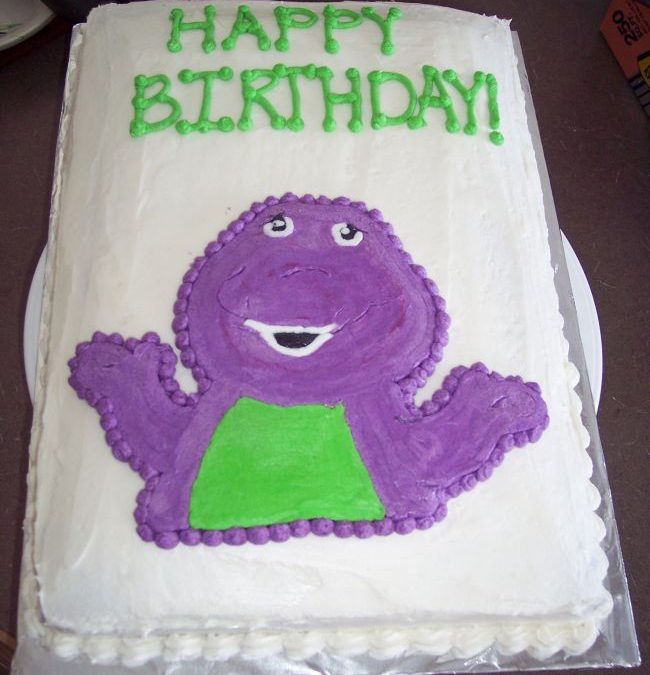
First is the Barney cake. I had a friend ask me if I could do one for her little girl, who suddenly decided she HAD to have Barney. Miraculously I found a barney shape pan at a second-hand store, but when I baked it the first time, big chunks of the cake stuck to the pan–which my sister has since informed me is fairly common with chocolate cake. Who knew? That cake became trifle (and was it ever tasty!) and I tried again. The second cake was even worse even though I was incredibly careful about making sure the pan was greased and floured properly–seriously not fixable at all. The chickens got to enjoy that one.
Finally I decided to do a rectangle cake with a buttercream transfer (thanks to my sister’s brilliant suggestion.) I had never done one before, but they are actually really easy. First I found a picture of Barney online, cropped it in Irfanview so it showed what I wanted it to, then imported it into Publisher so I could blow it up to the right size. Then I printed it. I was told to use a piece of pleiglass under the transfer to provide a stiff surface, but I didn’t have any on hand, so I used my cookie cooling rack, which has pretty small squares. I put the paper on top of the rack, then covered it with plastic wrap. Remember to do the small detials first (like the eyes), because the plastic wrap side is the side everyone will see. As long as that comes along nice, the back doesn’t matter. I then outlined and filled the picture. You want the buttercream to be fairly thick. Mine was probably about 3/16″ thick all over. This way it is easier to handle when it’s frozen. Next I moved the whole thing to the freezer–still on the cooling rack. Half an hour later, when the cake was otherwise done, I pulled it out and removed the plastic wrap from the picture, and set it on the cake. It was really stiff so it worked out great! I put a dotted border around Barney to finish the edges. Also, be aware every little line shows up in the buttercream, ans you will have to smooth some of them out. No worries, though. I just used the flat tip of a butter knife to smooth things out after it had a little time to defrost and it turned out just fine.

Next, my snowflake cake. I saw a picture online somewhere where they used the daisy cutout kind of like this and did the whole thing in white for a wedding cake and it was gorgeous, so I decided to play with the idea. This is just your basic white fondant with white snowflakes cut out. I did use some shimmer dust on the snowflakes, which you can’t see in the picture, but it turned out kind of cool. If I were going to do this again, I would roll the fondant thinner for the snowflakes so they didn’t pop quite so much, which would facilitate overlapping more. My critique group really enjoyed this one at our party.

Looks like there should be a story behind this one, does it? If you don’t know James Dashner or his books, you need to run out and check one of them out (he has two new ones out this year in two different series, check out his blog for details). Last weekend was the LDS Storymaker’s annual Christmas party–admittedly a bit after Christmas, but we were all kind of busy before. I signed up to bring dessert (because any time anyone asks me to sign up to bring something, of course I’m going to go for dessert, even if I don’t bring something cakish.). After looking around a bit for idea, I decided to do a book cake because we’re all writers and it seemed appropriate.
I used a variation of the standard Which Almond Sour Creak cake (I got this variation on Cake Central, but I generally use this one on recipezaar.) this was pumpkin spice cake with cinnamon buttercream filling. Now, if you’re going to decorate a normal round or square cake, you can use a box mix if you like, but if you plan to carve it at all, you need to use a heavier cake like the WASC type because it holds its shape better. This cake was done in a normal 9×13 cake pan (Okay, it was decorator pan, with square corners and straight sides, but it was still the standard shape.) I trimmed the sides a bit, cut it in half and stacked it, then trimmed a tad more to make it the right shape. I did need to use a firmer cake for this, even though it’s perfectly square because it had to be rotated a bit while I put on the fondant, so it wouldn’t fall apart. After filling and stacking the two layers, I set the cake on one long side and put buttercream along the three other sides of the book and applied the white fondant for the pages. You might be able to see the lines for the paper in the fondant, which I put there with my pastry cutter tool (like you use for cutting fats into flour for pie crusts and things). I wrapped the fondant around the tops and bottoms a bit so you wouldn’t see jagged edges where the cover met it.
Then I flipped the cake on the white fondant edge, applied buttercream to the three remaining sides and put on the blue fondant for the cover. One thing to note, I had planned to have the cover actually hang over the edges a bit, but forgot that marshmallow fondant shrinks slightly when you pull it off of the counter and put it on your cake, so next time I try something like this I’ll provide a whole lot more edge space. I wasn’t sure how to get nice smooth edges without folding it over, which make the cake a bit bulky, but it turned out all right overall. It was definitely a fun learning experience.
The accents are white buttercream with silver pearl dust covering them, which I applied with a little brush.
In the end I was trying to decide what the book should say on the outside and decided that poking fun at James Dashner would be entertaining. Thankfully, he was not only not offended, but genuinely seemed to think it was cool, so it was a hit with everyone. I had to actually cut the cake myself or it wouldn’t have been touched. People seem to forget cakes are for eating, no matter how cool looking they are.

Okay, so these last ones are cookies, not cakes, but I was pretty happy about how they turned out. Since cookies spread when you bake them, I used the same cookie cutter to cut out a piece of fondant so it fit the shapes perfectly. I used a bit of buttercream frosting to cement the cookies to the fondant. This gave me a nice, smooth surface to add details to. The bells have silver pearl dust for the ringers, I used pearl dragees for the details on the snowflakes. I have a set of kids watercolor brushes that I bought specifically for my cake decorating. I brushed the spot where the dragees would go on the fondant with water (just a tiny smidgeon), and because sugar tends to get sticky when it’s wet, with a little pressue when I pushed them on, they all stayed great. I used buttercream for the details on the snowmen.
In other news, my book has been climbing the list at Deseret Book and in the the past coupel of weeks in the General Fiction category has gone from 183 (of 184) to 43. I know, there are still a goodly number of books selling much better than mine, but I’m still very pleased to see the constant upward creeping of the count. Thanks to everyone who has helped get the word out!
Heather, How talented can one person be? 🙂 I love the cakes, especially the one for James Dashner. My son and I are reading his second Jimmy Fincher book right now and loving them. So……do you take orders? 🙂
Very Cool!
Thanks, ladies! It was fun to work on these. =)
What beautiful, fun cakes! You're awesome! (Just like James D.!)
Congratulations on your book climbing the ranks. So happy for you!
Loved the cakes. The snowflake one was my favorite. You are sooooooo talented. And one thing I love about your cakes, not only do they look good, but they taste GREAT!
Congrats on your book continuing to climb. 🙂
so pretty I love the snowflake cake.
mamat2730(at)charter(dot)net
Thanks! I had a lot of fun making them!
These are all gorgeous!! You talented cake and cookie baker, you!