After I wrote my previous gardening blog, I began looking into different ways for patio gardeners to keep their pots watered. I know I have a tendency to let my watering slide, which is why I didn’t use my large pots last year, but I knew there were various ways to make up for the problem. Last summer, a neighbor of mine complained that she had to water her patio pots twice a day during the hottest part of the summer–something that would definitely be the death of my plants.
There are gels on the market that you can mix with your potting soil that will soak up extra water, then release it as the soil dries out, but they can be pretty pricey. As I looked for these products, I found something even better–the self watering pot. You can buy these pre-manufactured, but they can be pricey–$25 for a medium-sized rectangle box. On the other hand, that can be fairly inexpensive if you would otherwise lose your plants.
While I was looking at these, I came across several Web sites that showed various ways to make your own self-watering pots, so I decided to give it a go. I’ve had these two planters for a couple of years, but nearly killed the flowers in them the first summer. Since I had them on hand, I decided to give it a go.

I scoured my house for bits and pieces that I would need for the project. I actually only had to purchase the pink netting from the fabric store ($1.10/yard), but all of these supplies are available in even tiny towns like mine. The wire is hardware cloth, but you could use a length of window screen instead if you attached it firmly to the pan. I’ve also seen people use medium-sized gravel or hollow balls of clay as spacers instead of the hardware cloth to leave the water somewhere to collect. Instead of the pink tulle, you could use anything with a weave tight enough to keep the potting soil out of the water.

I cut the hardware cloth large enough to wrap securely around the foil pans (3/$1 at many grocery stores or dollar stores).

I cut the corners out of the hardware cloth, then trimmed back the corners of the flaps on an angle–I didn’t do this on my first pot and the pan didn’t fit as well in the bottom of the pot.

I cut the pipe to length to it would stick out of the dirt only a couple of inches, then cut an angle on the side that would go into the pan. This is so the water will easily release into the pan.

I cut a four-by-four-inch hole in one corner of the metal mesh of the soil ‘wick’, then a one-inch hole in the other corner for the pipe-which is how we add water to the reservoir.

Make sure you get plenty of potting soil into the one corner of the pan-held in place my the pink tulle in this case, since it is what will pull the water up into the rest of the pot. If the container you use doesn’t have drainage holes, (you can use almost any water-tight container, including five-gallon buckets or those shoe-box sized clear containers), you need to drill a small hole at the height where you want the water to stop. This is an overflow to prevent over watering. Since my pot does have drainage holes, I figure the water will just begin draining over when it reached the top of the pan. It seems to be working for me.

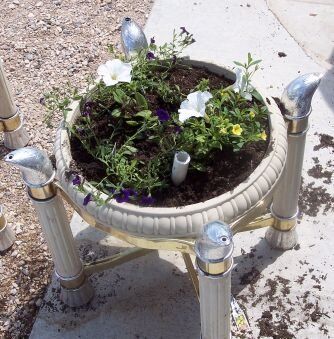
This what my pots looked like when I finished filling them. Notice the pipes stick out a couple of inches.

And it’s planted. In a few weeks the flowers will nearly hide the pipe, but I will be able to fill it with water with my watering can. After a week the plants still look healthy, despite the fact that I only water them every couple of days. I think one of the pans didn’t get placed quite flat, because it doesn’t seem to hold as much water, but the plants are still staying alive. This is probably a much more efficient way to water plants anyway, because the water won’t evaporate as quickly as it does when you top water.

That is really cool! Thanks for sharing the advice, and the pictures. I’m a visual learner.
What a great idea. I’d never heard of self-watering pots, but let me tell you, I am already a fan.
My plants die every year. I really don’t have a green thumb, so I need serious instructions on how to keep things alive. I love beautiful flowers–really, a lot–but I stink at potted ones.
Thanks for the instructions.
Nichole
Very cool, Heather. I’m good at watering for the first few weeks, but soon get tired of it.
This is a great idea!
Heather,
Great idea. And it seems the plants will be so much healthier this way, as well!
That is so stinking cool! I’m going to see if I’m handy enough to make one too!
Thanks ladies, I’m thrilled my pots are working out so well. I’m going to have to find more to do this with. lol